With this post, I’ll give you some information on measures and – of course – some sources for measures that I’m using for my home cockpit project. I’m planning to update this post continuously.
In general, the measures you will find on the internet can not always be taken over 1:1 without problems. This begins with the way, the measures are taken. People do often simply hold a tape measure on the parts so the measures are only nearly correct. But if you are building your home cockpit with a high DIY-proportion, it will become a unique thing in any way 🙂
So at least – measures can give you a lead or a direction, but they are not meant to be understood as absolute. In my personal experience, you will need to create you cockpit ‘around’ the parts that you may have bought from suppliers, e.g. when you are starting with the MIP-Panels, which actually isn’t a bad idea. You could say: Develop your cockpit from inside to outside.
As follows, I’m going to present you some selected sources, that I personally used to construct my cockpit and where I can confirm that the measures are accurate in the main.
Airbus OEM Measures
One excellent source for Airbus OEM measures is simpit. Here some Guy simply climbed an A320 cockpit with a tape measure. He took lots of photos from all parts.
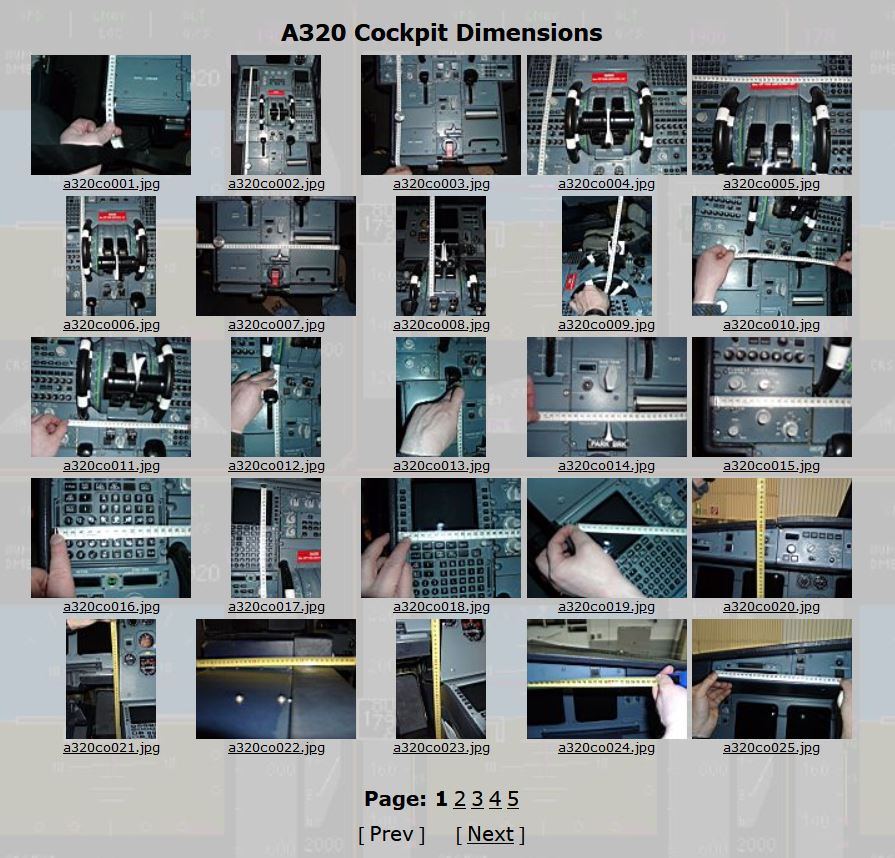
Link: http://www.simpit.de/index.html
CAD-Drawings
The two guys from Cockpit-Simulation drawed a Sketchup-File which was very helpful to me. They describe it as follows:

“The drawing is not a real detailed replica of the original A320 cockpit. In fact it is the best fit of all public data available at WWW supplemented with some calculated and indirect determined data.” (cockpitsim.wordpress.com)
Cockpit-Simulation charges some euros for the file, what I find appropriate if you look at what you get. My DIY-side window was made on basis of that measures. If in doubt, you will need to combine the measures with e.g. simpit or other sources.
Link: https://cockpitsim.wordpress.com/2015/01/26/unser-cockpit-als-3d-modell-bauplan-und-mase/
Selected Pictures
For measures that just didn’t want to fit with my construction, I always made use of my picture collection to get a feeling for the size of the parts. In worst case they allow at least to assume what should fit or not. I don’t have a source to all of them – I hope the originators don’t judge me for displaying them here. Please contact me if this is your picture!
Mostly, the pictures are originally from forums like the sadly switched off flightx.net or from other home cockpit blogs.


If you should have helpful pictures that should be displayed here – don’t hesitate to get in touch with me.
I think with this sources you should be able to start up with your home cockpit project. My personal recommendation is, to buy (or DIY) the Main Instrument Panels first. If you hold them in your hands, you can start to construct the Main Stand to ensure that it fits. I would clearly not recommend to start constructing, then buy some parts to later recognize that nothing fits together 🙂
To be clear, I had to rework my Main Stand for several times. But you can save time if you stick to my suggestions. Happy building 🙂

0 Comments