Hi there and welcome to my How-to-Start Series!
In this first post I’m going to explain all areas and parts of the A320 Cockpit, that are important to understand my upfollowing posts. Picture: Laurent Errera [CC BY-SA 2.0].
Because of the complexity of an aircraft like the A320, I can’t provide a complete description of all facts around the A320. Therefore, it may be a good idea to read the Wikipedia-Article about the A320 Family for example, to gain initial knowledge. First, now some fundamental information about the Airbus A320 Family regarding your home cockpit project.
The Airbus A320-Family
The A320 isn’t the only plane in Airbus’ short and medium haul program. There exist four different types of planes, belonging to the A320-Family. Those are (from small to large):
![<b>By Julien Scavini</b> (Own work) [CC BY-SA 3.0 (https://creativecommons.org/licenses/by-sa/3.0)]<b>via Wikimedia Commons](https://upwithoutwings.com/wp-content/uploads/2017/12/A32XFAMILYv1.0.png)
Picture by Julien Scavini [CC BY-SA 3.0]
- The A318
- The A319
- The A320
- And finally the A321
From the outside, the planes mainly distinguish only by their length, caused by the different number of passenger seats. But the engines and many other parts are fitted to the according type. Nevertheless, all four types may be flown with the one and only A320 Type-Rating. This is part of Airbus’ Commonalty-Strategy, which’s aim it is, to simplify the management of the aircraft by designing the systems and the cockpit as similar as possible across the whole Airbus-Fleet.
Why am I telling you this? When you are searching for plans, parts and pictures of an A320 Cockpit for your home cockpit, it doesn’t matter, if they are of an A318, A319 or other type of the A320-Family. The cockpits are all the same. Knowing this, we can now start to introduce you to the Airbus A320 Cockpit.
The Airbus A320 Family Cockpit
Let’s take a first view on the A320 Family Cockpit! Below you can find the name and explanation of the most important areas and parts of the cockpit.
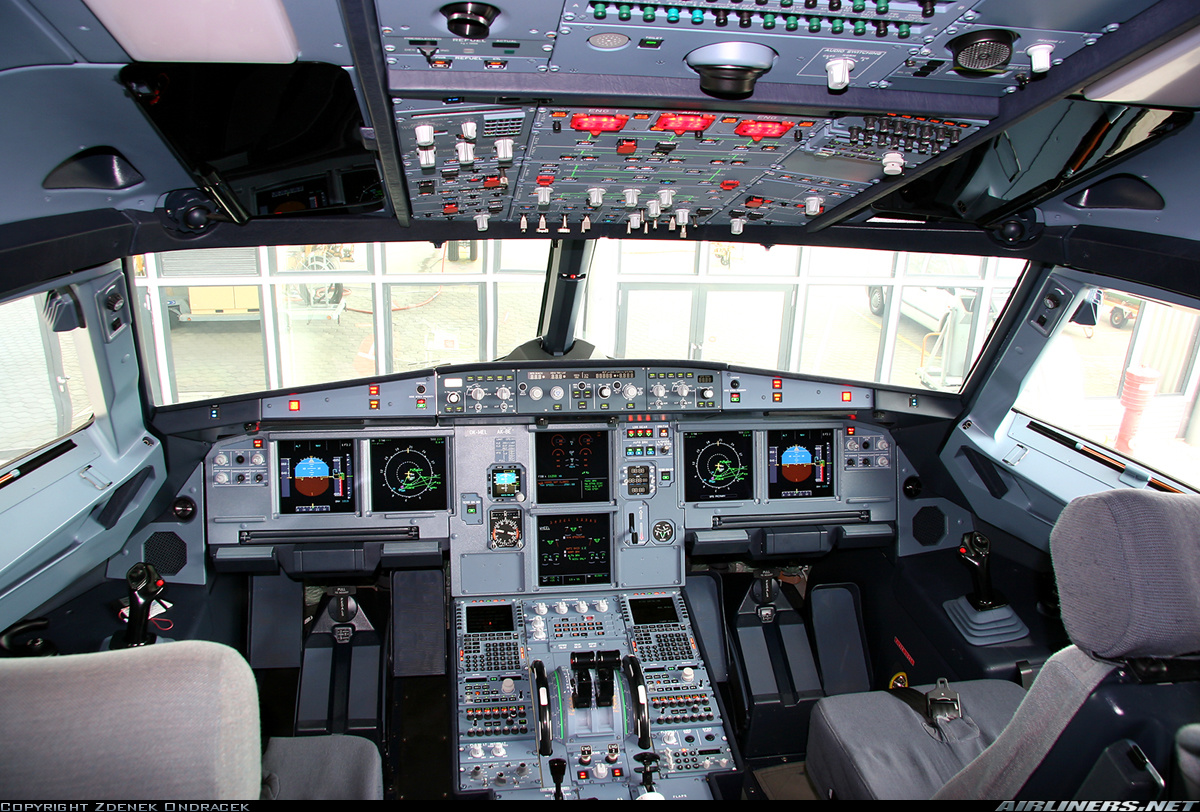
Picture by Zdeněk Ondráček, use granted for upwithoutwings.com
Overhead-Panel
Starting on the ceiling, you find the Overhead Panel. It is divided into a forward and an after section. On the forward section you can find the controls for e.g. electrics, hydraulics, bleed air, engine fire indication, lighting and air conditioning. The after section consists about the circuit breakers for all of the systems.
Glareshield
Moving downwards, beneath the front windows, we can find the so called Glareshield-Section. It’s called this way, because it prevents the displays from reflections through sunshine, as it protrudes by approx. 26cm.
Right in the middle of the Glareshield-Section there is the Flight Control Unit (FCU). With this very important control panel the pilots are programming height, heading and speed of the aircraft. Furthermore, the Auto-Pilot and Auto-Thrust Function can be de/activated.
To the left and right of the FCU, there are the EFIS-Panels (Electronic Flight Instrument System), they are identical on both sides, so each pilot can adjust his or her settings for the Navigation Display, activate the Flight Director (FD) or the Instrument Landing System (ILS). Which side is meant, is distinguished by the note “Captain Side” or “First Officer Side” (ofently shortened F.O.) You will often find this abbreviation in home cockpit communities or when corresponding with part manufacturers.
Directly next to the EFIS are the Warning-Panels, ofently called “Glare-Wings”, too. This is where the Master Warning and the Master Caution Buttons are located, for example.
Main Instrument Panel (MIP)
If we continue to move downwards, we come to the Main Instrument Panel (MIP). There you can see six displays in total. Two of them each on the left and on the right hand side. Those are identical on both sides and are called the Primary Flight Display (PFD) and the Navigation Display (ND). Those are probably the most important displays in the cockpit, because the PFD displays the artificial horizon, of which the pilot can recognize the attitude of the aircraft in pitch and bank. The ND displays the navigation route, airports, waypoints and the weather information, supported by the weather radar.
If we move more to the outer sides of the MIP, we first come to the PFD/ND Brightness Control Panel, also identical on both sides. As well as the Loudspeaker-Panels, that are placed right next to them. They are containing a loudspeaker and a gasper air vent.
Beneath the PFD/ND there is a tray table, than can be pulled out and unfolded. To the left and right of the tray table, there are two footrests that can be lowered, to allow the pilots an alternate sitting position.
In the middle of the MIP there are two displays, one above the other. The upper one is the Engine/Warning Display (EWD) and the lower one is the System Display (SD). Both are part of the Electronic Centralized Aircraft Monitor (ECAM), a system that provides the displays mentioned above, fault monitoring and corrective procedure checklists.
Furthermore, we can find the Landing Gear Lever and the Autobrake-Panel on the MIP, as well as the Brake-Pressure Gauge, which is oftenly called Triple-Gauge or T-Gauge, too.
Pedestal
Directly beneath the MIP, in the very middle of the cockpit, we find the Pedestal. It is also divided into a forward and after section, while the after section is less wide than the forward section.
In the forward section we have the Throttle with its Thrust Levers and the Engine Start Panel. To the right and left, we find the controls for the Weather Radar, Air Traffic Communication (ATC), Traffic Alert and Collission Avoidance System (TCAS) and also – very important – the Multifunctional Control and Display Unit (MCDU). Via the MCDU, the pilots enter e.g. the planned Flight Route, the Take Off-Speeds or the ILS-Frequency. Between both MCDUs there is the ECAM Control and Switching Panel. With those, the pilots control, what is currently displayed on the System Display (SD).
In the after section we have the controls for the Speedbrakes, the Flaps and the Cockpit Door. In the middle we find the Rudder Trim Panel with the Parking Brake Control and right next to it, the Gravity Gear Extension Lever, with which the pilots can unlatch the landing gear manually, so it is extended by gravity if the electronic/hydraulic function should be inoperative.
Furthermore we can find a panel, only with a handle and a narrow slot. Below this panel there is the ACARS Data Printer installed. (ACARS = Aircraft Communications Addressing and Reporting System).
Sidestick, Tiller and Sidebases
When you look to the side windows, you will see directly beneath them the Sidestick, which represents the main flight control interface of the A320 Family. The Tiller right next to it steers the nose wheel on the ground. Both controls are mounted on a platform called Sidebase.
If you have any questions or suggestions regarding the A320-Family, don’t hesitate to comment below or ask me via email!

0 Comments